


数据透视图是一种强大的数据可视化工具,能够帮助用户对数据透视表中的数据进行图表化展示。通过数据透视图,用户可以快速从海量数据中提炼出关键信息,识别趋势,并基于数据做出明智的决策。无论是销售数据分析、业绩评估,还是其他复杂数据的展示,数据透视图都能够以动态的方式呈现数据的整体概况和细节。在本文中,我们将演示如何使用 spire.xls for python 和 python 在 excel 中创建数据透视图。
安装 spire.xls for python
本教程需要 spire.xls for python 和 plum-dispatch v1.7.4。您可以通过以下 pip 命令将它们轻松安装到 windows 中。
pip install spire.xls如果您不确定如何安装,请参考此教程: 如何在 windows 中安装 spire.xls for python
python 在 excel 中创建数据透视图
spire.xls for python 提供了 worksheet.charts.add(pivotcharttype:excelcharttype, pivottable:ipivottable) 方法,支持基于 excel 中的特定数据透视表创建数据透视图。详细步骤如下:
- 创建 workbook 类的对象。
- 使用 workbook.loadfromfile() 方法加载 excel 文件。
- 使用 workbook.worksheets[index] 属性获取 excel 文件中的特定工作表。
- 使用 worksheet.pivottables[index] 属性获取工作表中的特定数据透视表。
- 使用 worksheet.charts.add(pivotcharttype:excelcharttype, pivottable:ipivottable) 方法向工作表添加数据透视图。
- 设置数据透视图的位置和标题。
- 使用 workbook.savetofile() 方法保存生成的文件。
- python
from spire.xls import *
from spire.xls.common import *
# 创建 workbook 对象
workbook = workbook()
# 加载 excel 文件
workbook.loadfromfile("示例.xlsx")
# 获取第一个工作表
sheet = workbook.worksheets[0]
# 获取工作表中的第一个数据透视表
pivottable = sheet.pivottables[0]
# 基于数据透视表创建数据透视图
pivotchart = sheet.charts.add(excelcharttype.columnclustered, pivottable)
# 设置图表位置
pivotchart.toprow = 1
pivotchart.leftcolumn = 11
pivotchart.rightcolumn = 20
pivotchart.bottomrow = 15
# 将图表标题设置为空
pivotchart.charttitle = ""
# 保存生成的文件
workbook.savetofile("创建数据透视图.xlsx", excelversion.version2013)
workbook.dispose()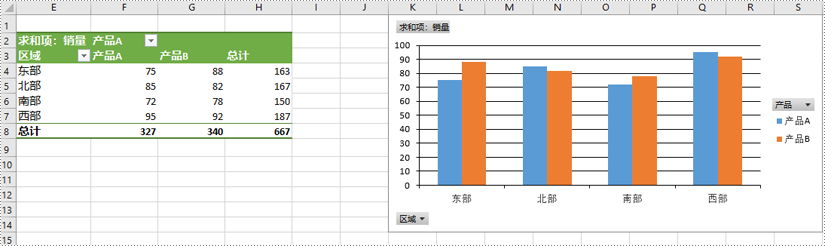
python 显示或隐藏 excel 数据透视图的字段按钮
你可以使用 spire.xls for python 在数据透视图中显示或隐藏以下字段按钮:
- 所有字段按钮
- 报告筛选字段按钮
- 图例字段按钮
- 轴字段按钮
- 数值字段按钮
详细步骤如下:
- 创建 workbook 类的对象。
- 使用 workbook.loadfromfile() 方法加载 excel 文件。
- 使用 workbook.worksheets[index] 属性获取 excel 文件中的特定工作表。
- 使用 worksheet.pivottables[index] 属性获取工作表中的特定数据透视表。
- 使用 worksheet.charts.add(pivotcharttype:excelcharttype, pivottable:ipivottable) 方法向工作表添加数据透视图。
- 设置数据透视图的位置和标题。
- 使用 chart.displayaxisfieldbuttons 和 chart.displayvaluefieldbuttons 等属性隐藏数据透视图中的轴字段按钮和数值字段按钮等。
- 使用 workbook.savetofile() 方法保存生成的文件。
- python
from spire.xls import *
from spire.xls.common import *
# 创建 workbook 对象
workbook = workbook()
# 加载 excel 文件
workbook.loadfromfile("示例.xlsx")
# 获取第一个工作表
sheet = workbook.worksheets[0]
# 获取工作表中的第一个数据透视表
pivottable = sheet.pivottables[0]
# 基于数据透视表创建数据透视图
pivotchart = sheet.charts.add(excelcharttype.columnclustered, pivottable)
# 设置图表位置
pivotchart.toprow = 1
pivotchart.leftcolumn = 11
pivotchart.rightcolumn = 20
pivotchart.bottomrow = 15
# 将图表标题设置为空
pivotchart.charttitle = ""
# 隐藏特定字段按钮
pivotchart.displayaxisfieldbuttons = false
pivotchart.displayvaluefieldbuttons = false
# pivotchart.displaylegendfieldbuttons = false
# pivotchart.showreportfilterfieldbuttons = false
# pivotchart.displayentirefieldbuttons = false
# 保存生成的文件
workbook.savetofile("隐藏字段按钮.xlsx", excelversion.version2013)
workbook.dispose()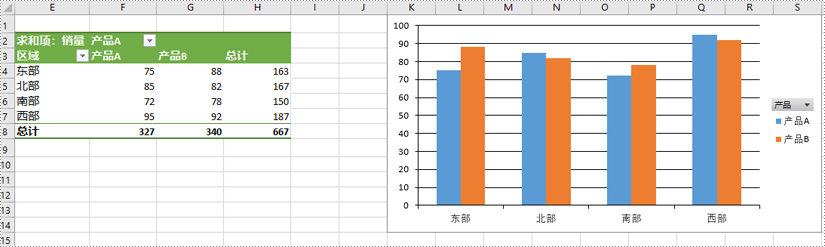
python 给 excel 数据透视图系列设置格式
当使用 spire.xls for python 基于数据透视表生成数据透视图时,数据透视图的系列不会自动创建。你需要向数据透视图添加系列,然后再应用所需的格式。详细步骤如下:
- 创建 workbook 类的对象。
- 使用 workbook.loadfromfile() 方法加载 excel 文件。
- 使用 workbook.worksheets[index] 属性获取 excel 文件中的特定工作表。
- 使用 worksheet.pivottables[index] 属性获取工作表中的特定数据透视表。
- 使用 worksheet.charts.add(pivotcharttype:excelcharttype, pivottable:ipivottable) 方法向工作表添加数据透视图。
- 设置数据透视图的位置和标题。
- 使用 chart.series.add() 方法向数据透视图添加系列,然后对系列应用所需的格式。
- 使用 workbook.savetofile() 方法保存生成的文件。
- python
from spire.xls import *
from spire.xls.common import *
# 创建 workbook 对象
workbook = workbook()
# 加载 excel 文件
workbook.loadfromfile("示例.xlsx")
# 获取第一个工作表
sheet = workbook.worksheets[0]
# 获取工作表中的第一个数据透视表
pivottable = sheet.pivottables[0]
# 基于数据透视表创建数据透视图
pivotchart = sheet.charts.add(excelcharttype.columnclustered, pivottable)
# 设置图表位置
pivotchart.toprow = 1
pivotchart.leftcolumn = 11
pivotchart.rightcolumn = 20
pivotchart.bottomrow = 15
# 将图表标题设置为空
pivotchart.charttitle = ""
# 添加图表系列
series = pivotchart.series.add(excelcharttype.columnclustered)
# 设置数据条的宽度
series.getcommonserieformat().gapwidth = 10
# series.getcommonserieformat().overlap = 100
# 保存生成的文件
workbook.savetofile("设置数据透视图系列格式.xlsx", excelversion.version2013)
workbook.dispose()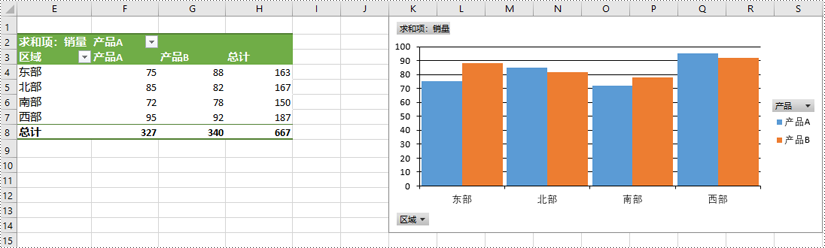
申请临时 license
如果您希望删除结果文档中的评估消息,或者摆脱功能限制,请该email地址已收到反垃圾邮件插件保护。要显示它您需要在浏览器中启用javascript。获取有效期 30 天的临时许可证。


